
Javascript is wild. The popular and incredibly accommodating language is never selfish. It will never put you in a box, nor will it keep you a leash. On the contrary, it should be the one on a leash, but instead walks calmly by your side, and only veers when it craves to show you something you’ve never seen before. Problems begin when we are not attentive to its deviations, and quickly become bridled ourselves by our own selfishness and negligence.
Developers and Javascript need checks and balances to keep each other under control. Whether that be guarding against typos, bad syntax, or anti-patterns, linting tools like ESHint, JSCS, JSLint, and JSHint can provide the safety net needed to write clean, lint-free code.
What is “linting”?
The process of linting will analyze uncompiled code for potential known errors. Since Javascript is uncompiled, the only way to check for errors without a linter is to run the code and hope for the best. We can do better.
ESLint
ESLint offers a flexible solution for linting Javascript. ESLint is highly configurable and extendable out of the box, so it can be used in many scenarios. It works well with teams that work on a shared code bases as well as the solo Javascript ninja. Other alternatives are JSLint (less configurable, more strict), and JSHint (configurable, but not extendable). At the time of writing ESLint has not yet reached v1.0.0, but it is established enough to use for linting production code and has implemented all of the JSHint rules plus many more features.
ESLint in Sublime Text 3
Before using ESLint in Sublime Text 3 we will need a variety of frameworks and plugins so that ESLint can lint our Javascript in real time as we type.
- Install Node.js.
- Install
eslintglobally vianpmwith the commandnpm install -g eslint. - Make sure Package Control for Sublime Text 3 is installed.
- Install the package
SublimeLinter, which acts as a framework for actual linting packages (not just Javascript). - Install ESLint as a linter for SublimeLinter with the
SublimeLinter-contrib-eslintpackage.
At this point if we create a new file in Sublime Text 3 and set its syntax to Javascript, once we starting writing Javascript we can see errors popping up.
Right away you’ll notice a lot of errors. This is because ESLint is using its
default configuration. To change this we can annotate our file with ESLint
specific comments, or we can add a .eslintrc file at the root of our project
so that ESLint can use that configuration for all .js files in a folder. For
more on configuring ESLint
refer to their documentation.
Configuration comments /* eslint ... */
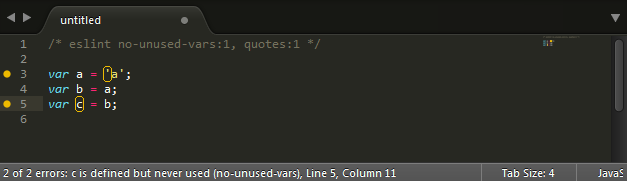
To configure ESLint rules inline, we can add Javascript comments containing
configuration options. Notice, by setting /* eslint no-unused-vars:1, quotes:1 */
our errors have turned into warnings. To remove the errors and warnings completely,
set the rule value to 0. The ability to show warnings instead of errors is a
very nice addition to ESLint when compared to JSHint.
Configuration files: .eslintrc
An .eslintrc file can be created in either JSON or YAML that will provide configuration
for an entire folder and all of its subfolders. Using the three sections of env
(environment), globals (global variables), and rules, we can provide a tailored
configuration for any project.
A simple .eslintrc file in JSON would look like
{
    "globals": {
        "myModule": true
    },
    "env": {
        "browser": true
    },
    "rules": {
        "no-unused-vars": 1,
        "quotes": 1
    }
}
or in YAML
---
  globals
    myModule: true
  env
    browser: true
  rules
    no-unused-vars: 1
    quotes: 1
Find a full list of rules here.
Helpful rules
If you are just getting your feet wet with linting, here are some helpful rules that are enabled by default.
no-cond-assignThis rule disallows assignment in conditional expressions, so a warning will occur when a statement looks likeif (x = 0) { ... }. Sometimes a second pair of eyes (like a linter!) can be extremely valuable so bugs like this don’t arise too easily.valid-typeofThis rule makes sure that comparisons with the result oftypeofare compared against the correct strings. For example,typeof [] === 'array'would create an error. Rookies will find ESLint helpful while they learn the intricacies of the language.
Alternatives
ESLint is one of the newest linting tools available. Other linters have been around much longer and have seen their fill of poorly written code. Definitely check them out before choosing which linter you will use on your next project.
- JSHint (configurable, but not extendable)
- JSCS (focuses more on style than correctness)
- JSLint (strict linter from Douglas Cockford)
- Google’s Closure Linter (follows the Google Javascript Style Guide)
Use multiple linters at once
If you use a build tool like Grunt or Gulp you can easily run multiple linters at once. Here is a sample Gulp setup using ESLint, JSHint, and JSCS, assuming you have an .eslintrc, .jshintrc, and .jscsrc already set up at the root of your project at minimum. Check out this gulpfile.js file in context of a sample project at kavun/multiplelinters.
var gulp = require('gulp');
var jscs = require('gulp-jscs');
var jshint = require('gulp-jshint');
var stylish = require('jshint-stylish');
var eslint = require('gulp-eslint');

var files = {
    js: 'src/*.js'
};

gulp.task('jscs', function () {
    return gulp.src(files.js)
        .pipe(jscs());
});

gulp.task('jshint', function() {
    return gulp.src(files.js)
        .pipe(jshint())
        .pipe(jshint.reporter(stylish));
});

gulp.task('eslint', function () {
    return gulp.src(files.js)
        .pipe(eslint())
        .pipe(eslint.format());
});

gulp.task('lint', ['jscs', 'jshint', 'eslint']);